Friday, November 20, 2009

Christmas Cards


Wow, it's been too long! Sorry about the lack of posts lately. The only thing I've been working on is printing Christmas cards. I usually carve a lino-block and use it to print my cards every year. It's so easy and rewarding, and fun to come up with a new design. I also like the not-so-perfect look of the prints, it gives it an old fashioned effect.


As far as lino-blocks go, I definitely recommend the sturdier, thin gray material over the "easy-cut" thicker, usually tan material. The easy cut is thicker and definitely cuts easier, but is extremely easy to break in half when you're handling it during printing.


For some reason I usually go with blue for Christmas, but this year I picked green because that's what I had the most paint of. I like the way they turned out. The only thing I would change is that I forgot to reverse the bird! I meant it to be printed facing left, but forgot about the reverse effect. Oh well.

Monday, October 26, 2009

Books

It's time for some awesome book recommendations. I've been finding several amazing books lately that are just too inspiring not to share.


Weekend Sewing: More than 40 Projects and Ideas for Inspired Stitching, by Heather Ross
I usually get my craft books from the library first, to make sure I want to splurge on buying them. This one is definitely worth paying for. There are so many great ideas for projects in here and they range from beginner to advanced. The amazing thing is, even the beginner projects caught my interest. There are just too many cool ideas to pass this one up. I even liked her suggestions for setting up a sewing space, which I finally have room for now!


Woven Treasures: One of a Kind Bags with Folk Weaving Techniques, by Sara Lamb

If you are interested in weaving, this is the book for you! She has some amazing projects to try all different types of weaving. There are two reasons the projects in this book are so great: 1) They are all bags, so they're useful, giftable, and straightforward to make. 2) Every project is done on the same loom: a rigid heddle loom. This is the perfect starter loom, very inexpensive and easy to use but with a wide variety of potential projects. I can't wait to try some of these bags!

Carefree Clothes for Girls, by Junko Okawa
Okay, so I haven't actually seen the inside of this one (or the next one) yet. But they just came out in English, and what I have seen of this one looks so fun to make! I'm expecting my first girl and I just can't wait to make her some dresses.

Felting for Baby, by Saori Yamazaki
How cool is this? I just love felting, and what better way to satisfy the urge to felt than a nice small project for baby! I'm sure the gifting possibilities are endless with these projects too.

Happy reading!

Thursday, October 22, 2009

Gallery Show

Sorry I haven't posted in a while, but I've been moving into a new house and getting ready for this:


I am so excited to have a gallery show! The silk paintings I made are very large and it just doesn't seem right for them to only hang in my house. If you are in the KC area, come check out the gallery for First Fridays in November!
Here is another of my panels and the write up for the show.


Suspended Narrative
Stories in Silk and Oil

Delicate silk paintings flowing with soft lines contrast with hard edged oil paintings and prints with intense color combinations. On the surface, the artwork created by Christy L. Berry and Steph Toth Kates seems curiously dissimilar at first glance. But dig a little deeper and the connection becomes clear. Both artists collect visual imagery from familiar stories and guide the viewer into a reflection of their personal connection with these tales.

Kates draws her imagery from fairytale and myth. Like myth, her paintings seek answers from a confusing universe, but on a more intimate level. They are interior landscapes – delving into remote inner corners where body and conciousness combine, exploring ideas of the body as a universe and a home. Inhabiting this inner expanse are animals familiar from children's storybooks along with cells, veins and neurons lifted from medical diagrams.

Berry’s silk paintings also reinterpret familiar stories. She draws her inspiration from Biblical passages – capturing fleeting moments in dream-like condensed images on voluminous silk panels. The women in her silks are both a self-portrait and a universal figure forming metaphors concerning the soul. Colors and lines flow and evoke the sense of an unexpected memory.

Stories twine throughout this exhibit – sometimes recognizable, sometimes just touching on a familiar cord but always inviting viewers to explore and impart their own memory, dream or experience into the narrative.

Friday, October 9, 2009

Updates

It was such a busy day at Missouri Town that this is the only picture I got of the weaving project. Unfortunately, you can't see the front where the pattern is. It was really fun demonstrating; there were so many people interested in the weaving process. The hard part was remembering where I was in the pattern sequence while talking to people. Needless to say, I had to unweave several times! I only got half way done, but when I finish and take it off the loom I will post more pictures. (Note the shawl and arm-warmers, it was chilly!)

Last week, my younger students felted balls and sticks and sewed them together to make little animals. This one is still getting its face stitched on. They had a lot of fun with it and were surprisingly good at the sewing part.

Here are students needle-felting. If you are looking for a super easy way to embellish, try needle-felting. It's instant gratification and no mess. The kids loved the "stabbing" motion, and thankfully only one needle was broken!

Close-up of a face in progress. She's felting very safely: foam underneath the project, pencil to hold in place (not fingers), and stabbing straight up and down.

And lastly, we spent all day Tuesday making apple butter. If my husband wasn't so motivated, I don't know if I would do it every year, but the end result is always worth it. This year we actually made twice as much as usual, which means more to share with friends!

Thursday, September 24, 2009

Mother-In-Law's Dress

A few months ago, my in-laws came to visit and I was wearing this dress. My mother-in-law liked it so much she asked me if I could make her one. She wanted a few things different like the color and thickness of the material and the length of the skirt and sleeves. It's such an easy pattern that I agreed.

I didn't end up finding the right fabric until we visited them again in St. Louis and we went fabric shopping together. There is this wonderful little fabric shop in Kirkwood called Sew It Seams. I was drooling over half of the fabrics in the store--lots of linen-silk blends, tencel, fine wools, and cool woven structures like herringbone. We decided on a lovely sage green tencel twill that fit both the requirements: it had a good drape and it wasn't see-through.


The printed pattern is one I borrowed from an Anthropologie blouse about 3 years ago. I'm very pleased I was able to use the print blocks again, and they're still in good condition despite being carved from the easy-cut stuff which typically breaks easily.


The hard part of this dress was the printing of the design. It's a little nerve-racking trying to line up each one and print the whole hem and sleeves evenly. It also took me longer than I remembered.


The finished product. It would look much better if I had a picture of her wearing it, but I got a call from her yesterday that she'd received it and it fit quite well. If I get a picture of her in it, I'll have to post it.

Just a note on sewing for other people: If someone wants a very specific thing made for them and it's fitted at all--good luck with that. I have had several experiences making fitted bodice dresses for friends that went very wrong and were very frustrating on both sides. It probably attests to my lack of sewing skills to fit people other than myself, but I would caution anyone considering a complex project for a friend. I agreed to this project because it was not fitted, was a very loose shift dress, and because I had made the pattern before and knew it was super easy.
Do you have any interesting stories about making things for other people?

Saturday, September 19, 2009

Student Felting


I teach art at a homeschool co-op and this year there was enough interest to offer a fiber art class. One of the first processes we're doing is felting. The students hand-felted a small sample piece in class first. Now we're doing a group felting effort on two large pieces that will be cut apart to make slippers or bags.

I laid out the wool at home on bamboo blinds (hardware removed), put a support cloth on either side of the wool to keep it stable, and then rolled it all up to take to class.


Usually 3 layers of wool roving is laid out, alternating the direction of the fibers. This roving seemed extra fluffy and thick, and I have a track record of making felt too thick, so I only did two layers.


At class, we went outside to the parking lot, unrolled the dry bundles and sprinkled hot, soapy water evenly over the wool. The bundles were then rolled back up tightly and secured with twine. Here are the girls taking turns felting with their feet.


The basic idea is that you step on the roll up and down one side, then turn it a quarter turn and step some more. Keep turning and stepping and about every 10 minutes unroll it and flip the felt before rolling it back up, to give even pressure. You can also sprinkle on more hot water to help the shrinking process. When it's good and felted, take it off of the cloth and dunk it in hot water, scrub it and mash it around to give it a final sturdy finish.

Things I learned from teaching this:
  • teenagers get bored of manual labor quickly
  • talking is distracting from learning good felting techniques
  • an hour is not enough time to felt a large piece

I took the rolls home and finished the felting myself, which didn't take too long, maybe 3 hours. The felt actually came out quite nicely, except for a few thin spots.

Saturday, September 5, 2009

Weaving 101: Starting to Weave


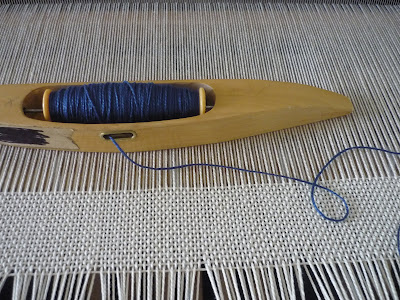
No matter what pattern you're weaving, you usually weave what's called a header in plain weave for one or two inches. This spaces out your warp threads evenly and can be used as a hem later. Here I've woven the header in the same cream as the warp.
My shuttle is ready to start the pattern in blue. A shuttle is what carries your weft thread back and forth through the shed (see previous post). It should be easy to throw through the shed with one hand. They come in various sizes and styles, but this one is a pretty normal model.
(I read that the word shuttle is original to weaving and later came to stand for anything that carries back and forth--such as a bus shuttle or a space shuttle. Interesting!)


Winding the bobbin is the same concept as when using a sewing machine, only you're probably going to do it by hand. Depending on how thick your yarn is, you'll have to stop weaving periodically and refill your bobbin. If you're weaving with more than one color, you'll probably have two bobbins in two shuttles going at the same time.


Here I've started weaving the main pattern. I haven't even gotten more than an inch done and I can already tell there's a problem with a certain area. Thankfully most of it looks quite pretty.


Squint your eyes when you look at this picture and you'll see what the pattern is supposed to look like.


Compare with this picture--I'm not just missing a thread here, it's also a skip in the pattern.

At this point, you grumble to yourself and rethread the heddles to fix the pattern. Bleck. Interestingly, this is the first time I've had to correct a problem this bad.

There won't be any more Weaving 101 posts until after October 4th. After I fix the pattern mistake, I'll save the main part of weaving for the Missouri Town Fall Festival. If anyone is in the Kansas City area, come by and see me demonstrating weaving the first weekend in October.