Showing posts with label woven. Show all posts

Monday, April 11, 2011

Color Workshop

Our guild hosted another workshop on the most popular topic in the weaving world: color! Our instructor was Ruby Leslie and her topic was how weave structure effects visual color blending. We all brought our own loom set up with a specific weave structure (all different ones) and then had a round robin weave-a-thon so that everyone got to weave each of the different structures.

Ruby did an excellent job explaining the different structures and their effects on color. The possibilities really are endless since you can change your vertical (warp) stripes and your horizontal (weft) color. She has done an incredible amount of sampling and research and was highly qualified to teach on this subject. I learned so much!


We were able to take home all of the samples we wove. Here are the two versions of plaid that I just loved. I would never think of putting these colors together, but they really are a beautiful combination. As much as I hate hot pink, that one stripe really brings it together!


This sample was really fun to weave. It is an 8-shaft advancing twill pattern--something I can't do on my 4-shaft loom.


This is the weave structure from my loom, called "bumberet". I had never seen anything like it before. It forms a sort of chain in rows and looks really nice with lots of warp stripes. My weft in this was just the medium green.


If you ever have the chance to take a weaving workshop, don't pass it up! You get so much knowledge and extra tips. In addition to all the workshop information, I learned how to tie a weaver's knot (very helpful for my next project). And I learned how to stop weaving in the middle of a project to cut off what you've woven and then be able to start right back up again. Those two tips were worth the price of the class!

Monday, April 4, 2011

Sewing with Handwoven Fabric

Here are a few highlights of my process. The main problems with handwoven fabric come from its loose and unstable state compared to store-bought fabric. First of all, the edges ravel almost immediately after cutting and so they must be secured as soon as possible. I have used a serger before on handwoven, but those were all rather straight edges. I cut out a test piece, one part of the sleeve, and serged it. As you can see in the photo above, compared to the pattern, it has been skewed out of shape by the serging. I was actually able to stretch it back into the right size and use it, but it was a good indicator that serging was out for this project.


I would highly recommend using as large of a table for cutting as possible. I used to just lay fabric out on the floor to cut, but that is a huge pain--mostly for your back!


I ended up doing two things to stabilize and secure the edges. After cutting out all of the pieces, I fused very thin interfacing strips along every cut edge. This worked wonderfully to prevent the fabric from becoming pulled out of shape, and it kept the fraying to a minimum while I was working with it.


Here you can see how different the fabric looks after pressing, compared to unpressed. It was extremely shiny after pressing. Because of that, I did as little pressing of the finished garment that I could.


The other finishing technique I used was to cover all the raw edges inside with bias tape. This makes the inside look very clean and neat, and it prevents any sort of fraying. The only drawback is that the already somewhat bulky seams are now bulkier. Surprisingly, it's not visibly noticeable, only when you're wearing it do you notice.


My other tip for the day is: follow directions and stay-stitch the neckline! I don't know about you, but I always skipped stay-stitching. It seems like such a worthless step if you're going to sew it anyway, right? Well, remember my stretched out/wonky neckline on the brown version of this? I did not change the pattern at all, I just stay-stiched it and my neckline came out perfect. Live and learn!


Do you have a sewing tip that's either a short cut or something you've learned cannot be skipped? Share it with us!

Sunday, March 20, 2011

Inheritance Dress


It's finished and my entry form is submitted! Whew!


I'll post details about making it soon. Below is my artist's statement.


I feel the need to make clothing that tells a story. When I wear a garment, I imagine places I could travel to and adventures I could have in it. In my Inheritance dress, I can picture myself climbing ancient trees somewhere in Europe, maybe I’m sailing the Mediterranean… Although I might imagine incredible adventures about this garment, I will still wear it in my normal, everyday life. Clothing that is made to wear in everyday life, yet has a unique and extraordinary quality is what excites me. I could make an evening gown, but I couldn’t wear it whenever I felt like taking a walk down the street. I find myself embracing Anita Mayer’s idea of wearing something magical and unique every day.

There is something magical about the word inheritance. It conjures up thoughts of finding a hidden treasure; like a gift of something ancient. At first glance the fabric seems plain, but it has a surprising subtlety of iridescence that gives rich depth to the cloth. Like it could have been from a royal robe unearthed after centuries. For me this ancient gift takes the form of a new life through faith in Jesus Christ. I have recently been studying with my church Paul’s letter to the Colossians and this passage had an impression on me: “Therefore, as God’s chosen people, holy and beloved, clothe yourselves with compassion, kindness, humility, gentleness and patience.” Being so immersed in making clothing, I am always intrigued by the role of clothing in the Bible. During our discussion, we talked about the ancient custom of putting on a new garment when receiving an inheritance. Believers in Christ have been made God’s children and thus receive His inheritance, so we put on the new clothing of serving Him with joy. When I wear this garment, I want to be encouraged to show compassion and kindness, no matter what adventures life brings. I want to be reminded of the hidden beauty of God’s kingdom and my identity in Him. That is the real story being told every day.


Friday, February 25, 2011

Cloth


I wish you could reach through your computer screen and feel my cloth. It is by far my favorite thing I've woven just because of the sumptuous texture. It drapes beautifully and feels like a textured silk. All 3 1/2 yards of it!

Washing it was different than I usually treat handwoven items. I have sewed with machine made tencel fabric before and so I knew that if you let it drip dry it feels like cardboard. But if you put it in the dryer--voila!--it turns into the loveliest softness.


I tried to capture the iridescence in this picture. I can tell the fabric is a little warp-faced (meaning more of the warp is showing than the weft) since the brown is definitely in the "background" and the blue is dominant. I still would have liked a darker coffee brown better, but it's too late to fix that so... stop thinking about it, right?
Now, on to the sewing!

Wednesday, February 2, 2011

Fabric!


Winter has been busy! I've begun a new weaving project which will end up being yardage for a garment to be entered in this garment contest at Handwoven magazine. Whew... I'm worn out just writing about it. Considering I started working on this before Thanksgiving, it's taking longer than usual, although Christmas kind of got in the way of working on it.

I wanted to share some of the things I'm doing differently with this project to help it go more smoothly than the tartan did. First of all I got myself a lamp to clip on the loom, as you can see in the picture. Don't underestimate the importance of lighting!


This is a shot of the main cloth, it's one of the treadling patterns from a German Bird's Eye (in Marguerite Davison's book). The warp is this bold royal blue (the closest thing I could find to what I wanted--still not happy) in 8/2 tencel. The weft is a medium cardboard brown--the only brown tencel I could find anywhere! My original color ideas were completely different and I'm still not completely satisfied with this combination... but I didn't want to bore you with my 3 month thought process on colors. Do you ever have difficulty picking color combinations? Do you have trouble finding the color, that elusive perfect shade that does not exist? I do.

One thing that I learned from weaving the tartan cloth was making sturdy selvedges to prevent warp threads from breaking. Here you can see this green 5/2 perle cotton on my selvedge. I put a good 1/2 inch of it doubled up so there is no chance of the tencel being rubbed and snapped. With a 30 inch wide warp, this is essential since it will be drawing in to around 27 inches.


The other plan for this project is that I will be able to tie on to the warp threads again after I cut off the fabric. Basically that means I won't have to take each thread and put it through the reed and the heddles again, I'll just have to tie a new thread on to the old ones. Another reason why I chose the German Bird's Eye pattern--it has 5 different treadling patterns. In the picture above you can see what you get when you do the plain weave treadling. It's sort of a plain weave with a group of 3 every 1/2 inch or so.
More on this soon!


Sunday, October 17, 2010

Kilt


It's finally done. Woven and sewn by hand. I have to say I'm actually pretty excited that it came out so well. I really was not expecting it to. I wore it to the Weavers Guild meeting last week and they snapped these pictures for me. (Yes, matching those stripes was pretty tedious.)


I would never have been able to sew it correctly if I hadn't been able to borrow a book from a fellow guild member--thanks Wendy! The Art of Kiltmaking by Barbara Tewksbury was wonderfully written and easy to follow. I have to say two things about using the book: 1) I think she is a little basting-happy. Pins work just as well for about half of the times she has you baste. 2) I am very glad I was working with my fluffy handwoven cloth and not some finer machine woven cloth--none of my stitches show because they just kind of get covered up by the yarn. I am a horribly messy and inconsistent hand-stitcher and it would look pretty awful if you could see all my stitches.


I also got to wear it to our annual dance performance at the Renaissance Festival. Let me just say, this skirt is absolutely amazing to dance in. It swishes really high and twirls wonderfully--every girl's dream right? I took the baby with me and she had her own "wee-kilt" and bonnet to wear. She was the star of the show of course. Her kilt was made as a gift by Wendy, it's in the Campbell tartan in case you're wondering.
I am so glad I spent all that time to make this kilt (2 months!), but would I ever do it again? Probably not. If you're interested in making your own kilt, it's very straightforward to sew. I would definitely sew one again, but I would buy the cloth instead of weaving it. The book estimates that a first-time kiltmaker will spend 40 hours sewing one. I think I did it in around 20 hours. (Maybe it's because I skipped all that basting!)
Do you have any projects that took forever, but were worth it in the end? Or not worth it?

Tuesday, September 14, 2010

Tartan Cloth


Yes, I am finally done weaving my tartan cloth. All 6 1/2 yards of it. Every night for the past week I've said to myself, I'll get it done tonight. Well, I finished it this morning. I just had to take a crazy lady picture because I really was going a little crazy thinking it would never be done. Between color changes every inch or so, warp threads snapping constantly, and a teething baby... let's just say it was not progressing very quickly.

Here it is before I cut it off of the loom. I think this is the first thing I've woven that I am completely satisfied with. The picture doesn't do the colors justice.
Now the loom looks sad and empty, but I'm only half way through. Now I have to tackle the daunting task of tailoring a kilt out of the cloth. You might not hear from me for a few more weeks, but definitely check back because I have to have it sewn before October.

Monday, August 23, 2010

Tartan... the beginning


I have just jumped off the diving board into the deep end of a huge project that I've wanted to weave for at least three years.... tartan cloth! I designed my own tartan based off of my triangle shawl, since I like the color combination so much. My family name doesn't have a tartan, so I figured making one up was even more fun. It wasn't until after I'd designed it that I realized most tartans are symmetrical. Oh well!

At this point I have all of my warp threads measured, chained, and they are threaded through my reed on the loom. All 900 of them! I'm only half way through the set up process. Next I'll be threading them through the heddles to set up the twill pattern.
My goal is to have it woven before my group dances at our Renaissance Festival the first weekend in October. Ideally, this will be a kilt. But I don't have high hopes since the fabric might be too thick to pleat and wear without sweating to death. We'll see how it turns out I guess. I'm so excited!

Tuesday, August 17, 2010

Pouches


I have been a busy bee working on all kinds of projects, which is why I haven't had time to post recently. These are going to be Christmas presents for some friends of mine this year. They are from a wonderful and super easy tutorial I found on noodlehead. She did an excellent job with the instructions. The only trouble I had was with the zipper end-covers getting sewn down. But by the fourth one, I was a pro!

The fabric strips on the front of these was a handwoven sampler that I cut up. I originally used the sampler as a practice weaving in my kids fiber art class last year. I wasn't sure what it would become, but I thought it was the perfect accent on these pouches.


This golden twill pattern is the same project as the green diamonds, only woven in a different order. Lots of weaving patterns will give different results depending on the order you raise the threads in.
If you're a sewer, this project is perfect for fabric scraps. You can create all kinds of different effects by mixing and matching. Mine are very subdued, but you could definitely do some bright and spunky ones.

Monday, July 26, 2010

Coverlet

Remember last year about this time... I had just put a project on the loom at Missouri Town (a historical site I volunteer at). Well, it's finally finished. I stitched the two halves down the middle to make one big blanket and hemmed the two ends.


If you've ever read the Kirsten series of American Girl books, it's about Swedish immigrants in 1855, and one of them talks about her mother weaving the coverlets for their beds and thinking that the idea of quilts is strange. So that's what this coverlet would be, a scandinavian type of bed covering.
It's just the right size for a child's trundle bed. Now it's on display in the downstairs bedroom at the tavern. The best part is that it looks like it belongs in the room. It looks just as old as the actual artifacts. It feels good to have completed a project.

Monday, July 19, 2010

Warped


A loom always looks better when it's dressed. I finally got my first project on the new loom and started weaving today. I had forgotten how fast the actual weaving part goes once you get past the set up. I already have two towels done!


I'm using an "undulating herringbone" pattern that I've been wanting to try for years. I'm so pleased with how it's coming out--and I didn't make any threading mistakes, hooray!

Of course, now I'm already planning two more projects. And these are much more complicated than towels. More on that later.

Tuesday, July 6, 2010

Christmas in July


My first loom was given to me by a woman in the Weavers Guild who had seven other looms in her house. She'd gotten this one at a garage sale for $200. The story was that it belonged to someone's great aunt in Alaska, then went to the niece in California, then somehow to another relative here in Missouri. It hadn't been used in at least 40 years. It's solid cherry and works well, but has some annoying glitches that need to be fixed by someone who knows what they're doing. I wove 3 or 4 projects on it, but they were all narrow--scarves or belts. (I didn't weave the one hanging on it.)

This year, my husband told me I could start looking for a used loom for my Christmas present--the type I wanted to weave yardage on, a Swedish style loom. I started looking around and within a month found this one. It is exactly what I wanted, a Glimakra 4-shaft with a 40" weaving width. If you look closely, you can see it's set up differently than my old one, which is an American style jack loom. If you ever are interested in buying a loom, I would highly recommend getting a used one. There are lots of people who think they're going to weave and never end up using a brand new loom. I paid less than half the price of a new one for this loom.
There are several perks to a Swedish style loom. First of all, a lot of things are adjustable including the bench height, the beater height and position, and the treadle (pedal) height. All that adjusting makes it easier on your body while weaving. It also has cloth heddles instead of metal ones, so no more "clank-clank-bang" noise--very important since I'll probably be weaving when the baby is asleep. Also, it's set up to produce a finer cloth with a tighter weave structure, which is what I'm wanting to do.

I've already started warping my first project: towels. Yes, towels. I never thought I'd waste my time making something like this, but I needed a quick sampler project that I wouldn't mind if it got ruined just to figure out the mechanics of the loom. I had a hard time resisting the urge to jump in and put a 40" wide, 5 yard long warp on right away. But then I actually started thinking about Christmas presents and decided to kill two birds with one stone and do a sampler project that would work for presents too. Thus, Christmas in July, for me and my relatives who will receive the towels. I'm also going to try a new pattern called "undulating herringbone" that I've been wanting to do ever since I started weaving. Hopefully I'll be posting woven towels on here in a month or so, if the baby is cooperative and lets me work on it!
Have you ever made a project that you weren't interested in? Did it end up being worthwhile or not?

Thursday, January 21, 2010

Student Projects


My fiber art students (at the homeschool co-op where I teach) have just finished weaving their drawstring tapestry bags. They had a lot of fun with the color combinations of their stripes, and the bags all came out beautifully.

The project is from a wonderful book, Kids Weaving, by Sarah Swett. All you need is a piece of cardboard cut to the size that you want your bag. The best thing about the project is that the bag is woven all in one piece around the cardboard, and the drawstring slits are woven in--so there's no sewing or finishing needed besides tucking in loose tails of yarn. The book has a lot of other great beginner weaving projects too.

This bag is almost done, she's just beginning to make the slits for the drawstring to pass through. The students much preferred using a tapestry needle to weave, rather than just their fingers. Several girls have already started making another bag at home, they enjoyed it so much.
During the work time in class, students also took turns weaving on a rigid heddle loom. Everyone had a chance to practice using it, and the result was a pretty blue and white scarf that will go to the winner of the drawing.

Saturday, September 5, 2009

Weaving 101: Starting to Weave


No matter what pattern you're weaving, you usually weave what's called a header in plain weave for one or two inches. This spaces out your warp threads evenly and can be used as a hem later. Here I've woven the header in the same cream as the warp.
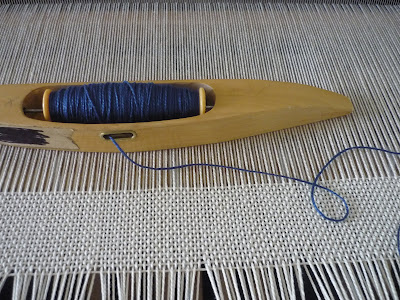
My shuttle is ready to start the pattern in blue. A shuttle is what carries your weft thread back and forth through the shed (see previous post). It should be easy to throw through the shed with one hand. They come in various sizes and styles, but this one is a pretty normal model.
(I read that the word shuttle is original to weaving and later came to stand for anything that carries back and forth--such as a bus shuttle or a space shuttle. Interesting!)


Winding the bobbin is the same concept as when using a sewing machine, only you're probably going to do it by hand. Depending on how thick your yarn is, you'll have to stop weaving periodically and refill your bobbin. If you're weaving with more than one color, you'll probably have two bobbins in two shuttles going at the same time.


Here I've started weaving the main pattern. I haven't even gotten more than an inch done and I can already tell there's a problem with a certain area. Thankfully most of it looks quite pretty.


Squint your eyes when you look at this picture and you'll see what the pattern is supposed to look like.


Compare with this picture--I'm not just missing a thread here, it's also a skip in the pattern.

At this point, you grumble to yourself and rethread the heddles to fix the pattern. Bleck. Interestingly, this is the first time I've had to correct a problem this bad.

There won't be any more Weaving 101 posts until after October 4th. After I fix the pattern mistake, I'll save the main part of weaving for the Missouri Town Fall Festival. If anyone is in the Kansas City area, come by and see me demonstrating weaving the first weekend in October.

Saturday, August 29, 2009

Weaving 101: Checking Pattern


The last part of the pattern set up is called the "Tie Up" (not to be confused with tying on). The tie up is diagrammed in your weaving pattern, it's the little square box with X's in the corner (see previous post). It tells you which shaft of heddles to attach to which pedal, or treadle (tred-le). This picture shows the treadles. The white strings coming down are detachable and you use these to determine which treadle will operate which combination of heddle shafts. All that means is: it makes your pattern come out.


When you push on a treadle with your foot (these are under the loom by the way), it raises whatever heddle shafts you've attached to it. So if you were just doing regular plain weave (over-under-over-under), you would only need 2 treadles: one to raise half of the threads, the other to raise the other half. I'm doing a twill, so I have the 2 left ones for plain weave and the 4 right ones for the twill pattern.


This is what happens when I press a treadle: half of the threads are raised and the other half stay down. This side view shows what's called the shed, it's a nice open space for your weft thread to go through.


Checking the pattern is important incase you have a threading error. I had one thread out of place that I had to fix (I'll spare you the details). This picture shows a close-up with my weft thread after 2 passes through the shed. It's just plain weave and should be the over-under pattern.

Thursday, August 27, 2009

Weaving 101: Tying On


Now that I've wound on all the warp length, I'm ready to tie the front ends to the front beam. Here the picture shows the ends after I've cut the loops, hanging ready to be tied.


Starting to tie on to the front beam. Always start with the outsides so that your beam is held out and won't wobble (it wobbles if you start in the center). Then move in to the center one group of threads at a time, alternating sides. The knot is the same as on the back beam.


Here all the threads are neatly tied across the front beam. Notice the tail length, it's a little bit long, but is easier to tie that way.


Lastly, check the tension of your threads. Tension is very important, so tweaking it until you're satisfied is important before you start weaving. The goal is to get all the threads with the same even tension. I always have trouble with the two side groups being loose, so I usually go back and tighten everything, leaving the sides for last.