Sunday, October 17, 2010

Kilt


It's finally done. Woven and sewn by hand. I have to say I'm actually pretty excited that it came out so well. I really was not expecting it to. I wore it to the Weavers Guild meeting last week and they snapped these pictures for me. (Yes, matching those stripes was pretty tedious.)


I would never have been able to sew it correctly if I hadn't been able to borrow a book from a fellow guild member--thanks Wendy! The Art of Kiltmaking by Barbara Tewksbury was wonderfully written and easy to follow. I have to say two things about using the book: 1) I think she is a little basting-happy. Pins work just as well for about half of the times she has you baste. 2) I am very glad I was working with my fluffy handwoven cloth and not some finer machine woven cloth--none of my stitches show because they just kind of get covered up by the yarn. I am a horribly messy and inconsistent hand-stitcher and it would look pretty awful if you could see all my stitches.


I also got to wear it to our annual dance performance at the Renaissance Festival. Let me just say, this skirt is absolutely amazing to dance in. It swishes really high and twirls wonderfully--every girl's dream right? I took the baby with me and she had her own "wee-kilt" and bonnet to wear. She was the star of the show of course. Her kilt was made as a gift by Wendy, it's in the Campbell tartan in case you're wondering.
I am so glad I spent all that time to make this kilt (2 months!), but would I ever do it again? Probably not. If you're interested in making your own kilt, it's very straightforward to sew. I would definitely sew one again, but I would buy the cloth instead of weaving it. The book estimates that a first-time kiltmaker will spend 40 hours sewing one. I think I did it in around 20 hours. (Maybe it's because I skipped all that basting!)
Do you have any projects that took forever, but were worth it in the end? Or not worth it?

Tuesday, September 14, 2010

Tartan Cloth


Yes, I am finally done weaving my tartan cloth. All 6 1/2 yards of it. Every night for the past week I've said to myself, I'll get it done tonight. Well, I finished it this morning. I just had to take a crazy lady picture because I really was going a little crazy thinking it would never be done. Between color changes every inch or so, warp threads snapping constantly, and a teething baby... let's just say it was not progressing very quickly.

Here it is before I cut it off of the loom. I think this is the first thing I've woven that I am completely satisfied with. The picture doesn't do the colors justice.
Now the loom looks sad and empty, but I'm only half way through. Now I have to tackle the daunting task of tailoring a kilt out of the cloth. You might not hear from me for a few more weeks, but definitely check back because I have to have it sewn before October.

Monday, August 23, 2010

Tartan... the beginning


I have just jumped off the diving board into the deep end of a huge project that I've wanted to weave for at least three years.... tartan cloth! I designed my own tartan based off of my triangle shawl, since I like the color combination so much. My family name doesn't have a tartan, so I figured making one up was even more fun. It wasn't until after I'd designed it that I realized most tartans are symmetrical. Oh well!

At this point I have all of my warp threads measured, chained, and they are threaded through my reed on the loom. All 900 of them! I'm only half way through the set up process. Next I'll be threading them through the heddles to set up the twill pattern.
My goal is to have it woven before my group dances at our Renaissance Festival the first weekend in October. Ideally, this will be a kilt. But I don't have high hopes since the fabric might be too thick to pleat and wear without sweating to death. We'll see how it turns out I guess. I'm so excited!

Tuesday, August 17, 2010

Pouches


I have been a busy bee working on all kinds of projects, which is why I haven't had time to post recently. These are going to be Christmas presents for some friends of mine this year. They are from a wonderful and super easy tutorial I found on noodlehead. She did an excellent job with the instructions. The only trouble I had was with the zipper end-covers getting sewn down. But by the fourth one, I was a pro!

The fabric strips on the front of these was a handwoven sampler that I cut up. I originally used the sampler as a practice weaving in my kids fiber art class last year. I wasn't sure what it would become, but I thought it was the perfect accent on these pouches.


This golden twill pattern is the same project as the green diamonds, only woven in a different order. Lots of weaving patterns will give different results depending on the order you raise the threads in.
If you're a sewer, this project is perfect for fabric scraps. You can create all kinds of different effects by mixing and matching. Mine are very subdued, but you could definitely do some bright and spunky ones.

Monday, July 26, 2010

Coverlet

Remember last year about this time... I had just put a project on the loom at Missouri Town (a historical site I volunteer at). Well, it's finally finished. I stitched the two halves down the middle to make one big blanket and hemmed the two ends.


If you've ever read the Kirsten series of American Girl books, it's about Swedish immigrants in 1855, and one of them talks about her mother weaving the coverlets for their beds and thinking that the idea of quilts is strange. So that's what this coverlet would be, a scandinavian type of bed covering.
It's just the right size for a child's trundle bed. Now it's on display in the downstairs bedroom at the tavern. The best part is that it looks like it belongs in the room. It looks just as old as the actual artifacts. It feels good to have completed a project.

Monday, July 19, 2010

Warped


A loom always looks better when it's dressed. I finally got my first project on the new loom and started weaving today. I had forgotten how fast the actual weaving part goes once you get past the set up. I already have two towels done!


I'm using an "undulating herringbone" pattern that I've been wanting to try for years. I'm so pleased with how it's coming out--and I didn't make any threading mistakes, hooray!

Of course, now I'm already planning two more projects. And these are much more complicated than towels. More on that later.

Tuesday, July 6, 2010

Christmas in July


My first loom was given to me by a woman in the Weavers Guild who had seven other looms in her house. She'd gotten this one at a garage sale for $200. The story was that it belonged to someone's great aunt in Alaska, then went to the niece in California, then somehow to another relative here in Missouri. It hadn't been used in at least 40 years. It's solid cherry and works well, but has some annoying glitches that need to be fixed by someone who knows what they're doing. I wove 3 or 4 projects on it, but they were all narrow--scarves or belts. (I didn't weave the one hanging on it.)

This year, my husband told me I could start looking for a used loom for my Christmas present--the type I wanted to weave yardage on, a Swedish style loom. I started looking around and within a month found this one. It is exactly what I wanted, a Glimakra 4-shaft with a 40" weaving width. If you look closely, you can see it's set up differently than my old one, which is an American style jack loom. If you ever are interested in buying a loom, I would highly recommend getting a used one. There are lots of people who think they're going to weave and never end up using a brand new loom. I paid less than half the price of a new one for this loom.
There are several perks to a Swedish style loom. First of all, a lot of things are adjustable including the bench height, the beater height and position, and the treadle (pedal) height. All that adjusting makes it easier on your body while weaving. It also has cloth heddles instead of metal ones, so no more "clank-clank-bang" noise--very important since I'll probably be weaving when the baby is asleep. Also, it's set up to produce a finer cloth with a tighter weave structure, which is what I'm wanting to do.

I've already started warping my first project: towels. Yes, towels. I never thought I'd waste my time making something like this, but I needed a quick sampler project that I wouldn't mind if it got ruined just to figure out the mechanics of the loom. I had a hard time resisting the urge to jump in and put a 40" wide, 5 yard long warp on right away. But then I actually started thinking about Christmas presents and decided to kill two birds with one stone and do a sampler project that would work for presents too. Thus, Christmas in July, for me and my relatives who will receive the towels. I'm also going to try a new pattern called "undulating herringbone" that I've been wanting to do ever since I started weaving. Hopefully I'll be posting woven towels on here in a month or so, if the baby is cooperative and lets me work on it!
Have you ever made a project that you weren't interested in? Did it end up being worthwhile or not?

Monday, June 28, 2010

skirts

This is the first skirt I ever made. It is an airline blanket that I took with me to the Cornerstone Music Festival, back in the summer of 2001. It was extremely hot and, out of desperation and a newfound hatred of shorts, I sewed this skirt with a sewing kit someone from the next campsite had. It is probably still my favorite skirt even though it looks pretty junky. It's certainly gotten enough wear these past nine years! (wow, I'm old.)

If the airline blanket skirt is my favorite, my brown circle skirt is definitely second favorite. I found this vintage brown linen at a garage sale about four years ago and made my first circle skirt. As you can see, the hemline is very uneven, in fact it's not really a line at all! I did not really know what I was doing and so the sides are shorter than the front and back. But, if you know me, you know that doesn't bother me one bit. I think this is the main reason I've stuck with sewing for so long. When most people would get frustrated and rip something out, I would just say, "eh, it looks fine" and wear it. I have definitely come a long way though...


Here's a close-up of the tie and button to keep the opening closed. (notice the sloppy stitching)


And here is my next attempt at a circle skirt, which as you can see has an even hemline--hooray! I think this one is only two years old. But it doesn't get worn as often because everything goes with brown, and not everything goes with this blue.
So, the point of this post is two-fold:
1) Don't let yourself get overly frustrated if you're learning to sew. If you are, do one of two things, either stop sewing and come back to the project some other day (I do this a lot!) or just say to yourself, "no one else will notice this mistake, so I'm not going to care." and just leave it. (I know I'm making some of you cringe.)
2)I absolutely love and adore circle skirts because they are extremely easy to make and they're very full without having gathers. So I thought I would post a simple tutorial here sometime before the end of summer. Believe me, if you make a circle skirt, you'll fall in love too!

Do you have a favorite skirt? What style is it? What makes you love it?

Monday, June 21, 2010

wrap skirt


A friend and I went in together and bought Heather Ross's Weekend Sewing. This skirt is from the book and is actually on the front cover. I really like how it came out, and it's perfect for summer.


Unfortunately, I have to say that the pattern's instructions are not written correctly. The directions call for 6 panels of the skirt for the medium size--well, that does not fit around my waist, much less overlap itself. Of course I just got some more material and cut out 2 more panels. I also had to lengthen the waistband/tie. But I can see a beginning sewer having a real issue with this. I'm sure Heather Ross knows what she's doing. It seems like a lot of patterns get written wrong in the editing process of a book or magazine--how frustrating!
Have any of you run into this? Do you ever find yourself reading a store-bought pattern and think the people who wrote it were on drugs? I do!

Monday, June 14, 2010

dream-dress

I got this dress from Anthropologie as my birthday present a few weeks ago. I almost didn't buy it because it was strapless, but there were secret little straps hiding in a bag clipped to the tag! And it's in linen!

My usual reason to go to Anthropologie is to get inspiration for clothing designs. I have actually only bought something from there one other time, and both of these things have been on the sale rack. But my philosophy on expensive clothing is: if I would spend lots of money on the fabric and hours of my time trying to make it and then fail--then it's worth it to spend a little money for a nice piece of clothing. And this dress is definitely the type of fitted bodice and full skirt style that I've been trying versions of for years and never getting right.

Another great clothing philosophy is that you can always find something sort-of-okay and alter it to be better and unique. I did this a lot in college with thrift-store finds. Two of my favorite dresses in college were both from the maternity section, and all I did was take them in to be fitted. Have you ever altered something that wasn't great and made it a favorite?

What are your "clothing philosophies"?

Monday, June 7, 2010

matryoshka


Yes, these are knitted nesting dolls! I randomly came across a book in the library
called Itty Bitty Toys. It has wonderful ideas for knitted toys and they are very straightforward. I couldn't resist making these cute matryoshka, and they were incredibly fast to make. The best part--the baby was entertained by watching the knitting needles!

Monday, May 31, 2010

dirndl variation

This is another project started during pregnancy and not completed until after the baby was born. In hindsight, I don't think my belly would have fit under the waistline, even though I made it higher. The way it turned out reminds me a little of a regency-style dress.

My mother-in-law bought me the amazing fabric at a store in St. Louis--it's a linen and silk blend. Just heavenly in texture! I would make everything out of this if I could. The pattern is from Folkwear, a traditional Austrian dirndl that I changed a lot to get this result.


What is a dirndl? Basically a type of dress that is sleeveless and buttons in the front with a full skirt, although there are several variations on it. I fell in love with the style while watching Julie Andrews in The Sound of Music. I'd really like to make one with a dropped waist like she wears in the movie.


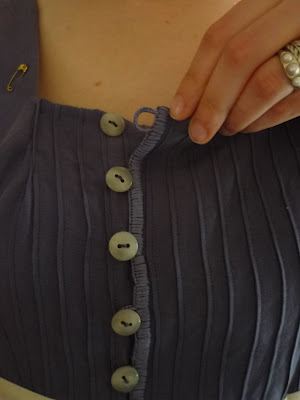
Here is a close-up of the main alterations to the pattern. I added in a lot of width to the bodice front so I could make these nice pleats. I also tried a hand-made button hole technique learned last summer at the weaving conference--it worked really well! The light purple edging and button holes are done using the blanket stitch, which is very easy. I also didn't make the skirt very full. It's basically an A-line with pleats in the front.


Monday, May 24, 2010

chinese-style robe

This project was actually started last summer as something to wear during my pregnancy, but I didn't finish the embroidery until the week after the baby was born! So now it just needs a belt to cinch in the waist. The material is blue linen with a white linen facing, and then just white cotton embroidery thread.

The pattern, from Folkwear, was extremely easy. I did do a few things differently than the instructions though. The trim is supposed to be a thick band of contrast material, but I turned this to the inside as a facing and just left a thin piping edge showing. The overlap of the robe is traditionally fastened with "frog" closures, but I couldn't find any--and I was snapping so many onesies on the baby that I thought snaps would work well, and they do! The belt was also an addition to the pattern. The best part about this is that I can easily unsnap it to nurse the baby. (Alas, much of my wardrobe is unwearable right now because of the need for nursing access.)
If I made another one, I would probably use a looser, more drapey fabric. The linen is a little stiff.

Monday, May 3, 2010

Bird Mobile


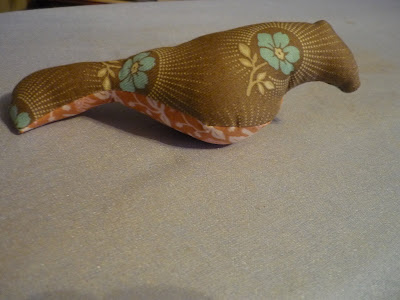
This is one of the few hand-made things that I thought would be worthwhile for a baby. The birds were amazingly easy and quick. The branch is cut and hung easily too--this one is from our crabapple tree. I really like the organic shapes of the branch and birds together, whether a baby knows what they are or not it's nice for me to look at!

The pattern is from Spool and there is a huge flickr pool of ideas.

It was really fun going to my favorite fabric store (Sarah's in Lawrence, KS) and picking out all the different colors. I bought fat quarters of every color and only used about 1/6 of each piece, so I'm trying to decide on another project to use them with.


This bird is one I made for a friend who just had her baby. The two-color combinations are endless.


Here's a picture I took of what the baby sees lying in the crib. And to my delight, I actually caught her looking and cooing at them the other morning--yay, it works!
And if you don't know any babies to make them for, I thought they'd look great on a Christmas tree or even as a wall decoration in the house. (I'll probably be making more of them at some point for one or both of these purposes.)
Do you know of any super-quick-and-easy projects like this? It seems like good ones are hard to find.

Wednesday, March 31, 2010

Excuses...

I really do have a good excuse for the long absence:


Our daughter, Galena Rose, was born March 13 at 2:17 pm, 8 lbs 6 oz, 20 1/2 inches long. We've been pretty busy just enjoying her company.

I do have lots of projects to post about, so hopefully I'll get to that soon.

Thursday, January 21, 2010

Student Projects


My fiber art students (at the homeschool co-op where I teach) have just finished weaving their drawstring tapestry bags. They had a lot of fun with the color combinations of their stripes, and the bags all came out beautifully.

The project is from a wonderful book, Kids Weaving, by Sarah Swett. All you need is a piece of cardboard cut to the size that you want your bag. The best thing about the project is that the bag is woven all in one piece around the cardboard, and the drawstring slits are woven in--so there's no sewing or finishing needed besides tucking in loose tails of yarn. The book has a lot of other great beginner weaving projects too.

This bag is almost done, she's just beginning to make the slits for the drawstring to pass through. The students much preferred using a tapestry needle to weave, rather than just their fingers. Several girls have already started making another bag at home, they enjoyed it so much.
During the work time in class, students also took turns weaving on a rigid heddle loom. Everyone had a chance to practice using it, and the result was a pretty blue and white scarf that will go to the winner of the drawing.