Thursday, September 24, 2009

Mother-In-Law's Dress

A few months ago, my in-laws came to visit and I was wearing this dress. My mother-in-law liked it so much she asked me if I could make her one. She wanted a few things different like the color and thickness of the material and the length of the skirt and sleeves. It's such an easy pattern that I agreed.

I didn't end up finding the right fabric until we visited them again in St. Louis and we went fabric shopping together. There is this wonderful little fabric shop in Kirkwood called Sew It Seams. I was drooling over half of the fabrics in the store--lots of linen-silk blends, tencel, fine wools, and cool woven structures like herringbone. We decided on a lovely sage green tencel twill that fit both the requirements: it had a good drape and it wasn't see-through.


The printed pattern is one I borrowed from an Anthropologie blouse about 3 years ago. I'm very pleased I was able to use the print blocks again, and they're still in good condition despite being carved from the easy-cut stuff which typically breaks easily.


The hard part of this dress was the printing of the design. It's a little nerve-racking trying to line up each one and print the whole hem and sleeves evenly. It also took me longer than I remembered.


The finished product. It would look much better if I had a picture of her wearing it, but I got a call from her yesterday that she'd received it and it fit quite well. If I get a picture of her in it, I'll have to post it.

Just a note on sewing for other people: If someone wants a very specific thing made for them and it's fitted at all--good luck with that. I have had several experiences making fitted bodice dresses for friends that went very wrong and were very frustrating on both sides. It probably attests to my lack of sewing skills to fit people other than myself, but I would caution anyone considering a complex project for a friend. I agreed to this project because it was not fitted, was a very loose shift dress, and because I had made the pattern before and knew it was super easy.
Do you have any interesting stories about making things for other people?

Saturday, September 19, 2009

Student Felting


I teach art at a homeschool co-op and this year there was enough interest to offer a fiber art class. One of the first processes we're doing is felting. The students hand-felted a small sample piece in class first. Now we're doing a group felting effort on two large pieces that will be cut apart to make slippers or bags.

I laid out the wool at home on bamboo blinds (hardware removed), put a support cloth on either side of the wool to keep it stable, and then rolled it all up to take to class.


Usually 3 layers of wool roving is laid out, alternating the direction of the fibers. This roving seemed extra fluffy and thick, and I have a track record of making felt too thick, so I only did two layers.


At class, we went outside to the parking lot, unrolled the dry bundles and sprinkled hot, soapy water evenly over the wool. The bundles were then rolled back up tightly and secured with twine. Here are the girls taking turns felting with their feet.


The basic idea is that you step on the roll up and down one side, then turn it a quarter turn and step some more. Keep turning and stepping and about every 10 minutes unroll it and flip the felt before rolling it back up, to give even pressure. You can also sprinkle on more hot water to help the shrinking process. When it's good and felted, take it off of the cloth and dunk it in hot water, scrub it and mash it around to give it a final sturdy finish.

Things I learned from teaching this:
  • teenagers get bored of manual labor quickly
  • talking is distracting from learning good felting techniques
  • an hour is not enough time to felt a large piece

I took the rolls home and finished the felting myself, which didn't take too long, maybe 3 hours. The felt actually came out quite nicely, except for a few thin spots.

Saturday, September 5, 2009

Weaving 101: Starting to Weave


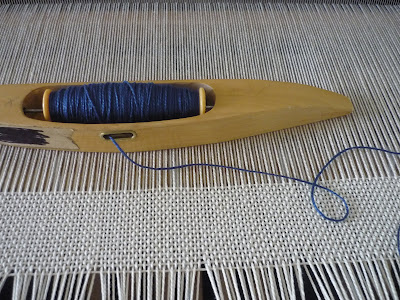
No matter what pattern you're weaving, you usually weave what's called a header in plain weave for one or two inches. This spaces out your warp threads evenly and can be used as a hem later. Here I've woven the header in the same cream as the warp.
My shuttle is ready to start the pattern in blue. A shuttle is what carries your weft thread back and forth through the shed (see previous post). It should be easy to throw through the shed with one hand. They come in various sizes and styles, but this one is a pretty normal model.
(I read that the word shuttle is original to weaving and later came to stand for anything that carries back and forth--such as a bus shuttle or a space shuttle. Interesting!)


Winding the bobbin is the same concept as when using a sewing machine, only you're probably going to do it by hand. Depending on how thick your yarn is, you'll have to stop weaving periodically and refill your bobbin. If you're weaving with more than one color, you'll probably have two bobbins in two shuttles going at the same time.


Here I've started weaving the main pattern. I haven't even gotten more than an inch done and I can already tell there's a problem with a certain area. Thankfully most of it looks quite pretty.


Squint your eyes when you look at this picture and you'll see what the pattern is supposed to look like.


Compare with this picture--I'm not just missing a thread here, it's also a skip in the pattern.

At this point, you grumble to yourself and rethread the heddles to fix the pattern. Bleck. Interestingly, this is the first time I've had to correct a problem this bad.

There won't be any more Weaving 101 posts until after October 4th. After I fix the pattern mistake, I'll save the main part of weaving for the Missouri Town Fall Festival. If anyone is in the Kansas City area, come by and see me demonstrating weaving the first weekend in October.